
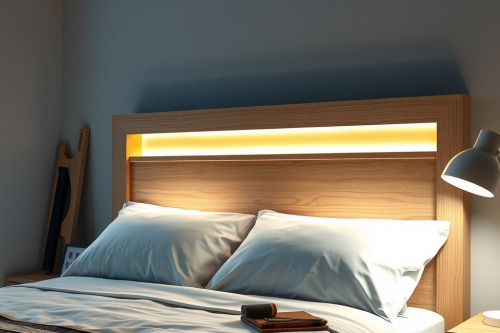
Milling deep blind channels into finished hardwood poses a serious risk of ruined stock if your tool wanders. After 15 years building custom bedroom cabinetry, I've seen too many apprentices ruin timber by rushing a cut. Executing a custom headboard with integrated LED lighting requires strict feed control and the right tooling setup. Get your baseline measurements locked in before spinning a single cutter.
Selecting the wood router for Precision Channel Cuts
Don't grab an underpowered laminate trimmer for hogging out continuous 20mm grooves in white oak. You need a mid-sized plunge base wood router pushing at least 2.25 horsepower. A compact trim unit will bog down under sustained load. When RPM drops, the bit drags immediately, leaving jagged walls and heat discoloration along your clean grain lines.
Power Ratings and Collet Capacity
Always choose a machine with a 1/2-inch collet over a 1/4-inch alternative. Heavy 1/2-inch shank straight bits absorb vibration efficiently. Thin shanks flex under lateral pressure, inviting fatal collet slip mid-pass. If you consult an objective wood router review, variable speed dial control ranks as an essential feature for running wider carbide cutters at 16000 to 18000 RPM.
Plunge Base Smoothness and Depth Stops
Inspect the plunge action before turning on the power switch. Sticky plunge pillars ruin stopped channel cuts. We look for brass bushings with micro-fine turret adjustments. Lock the base down firmly. Make sure the return springs push back smoothly without racking sideways across the sub-base plate.
Material Prep for a Custom Headboard with Integrated LED Lighting
Lumber selection determines whether your channel edges stay crisp or splinter into garbage. Flatten your raw boards thoroughly on the jointer before edge-gluing your headboard slab. Wood with internal tension pinches spinning router bits instantly.
Selecting Hardwood Over Softwood Stock
Quarter-sawn walnut, cherry, or hard maple yield the cleanest results when grooved. Pine and soft fir produce excessive tear-out across the grain shoulders. If you must run softwoods, score your layout lines with a marking knife first. Severing surface fibers by hand prevents the spinning cutter from lifting entire grain strips away from the rebate edge.
Setting Straightedge Guides and Fixtures
Never rely on eyeball alignment for lighting channels. Clamp a rigid aluminum extrusion or shop-made phenolic guide rail directly over your workpiece. Secure the track using two heavy-duty F-clamps torqued to minimum 2 kN clamping force. Back up the guide path with a zero-clearance featherboard to keep the router base pinned tight against your fence.
Router Setup to Prevent Bit Chatter and Tear-Out
Chatter marks along an exposed LED channel show up aggressively once the lighting illuminates the backdrop. Vibration stems directly from incorrect feed rate, loose motor housings, or dull tooling.
Managing Pass Depth and Feed Rates
Never hog out a 15mm deep groove in one single cut. Take multiple incremental passes. Set your profile depth to no more than 4mm per pass to minimize mechanical stress. Move the tool at a consistent pace across the board face. Moving too slowly causes burning the stock, charring the timber and dulling your carbide edges permanently.
Eliminating Vibration and Deflection
Insert the router bit shank at least 22mm deep into the chuck. Avoid bottoming out the bit directly against the arbor floor. Leave a 2mm gap at the bottom before tightening the nut. This clearance prevents bit chatter from transmitting through the motor bearings and into your finished headboard face.
Milling Channels for a Custom Headboard with Integrated LED Lighting
Recessed aluminum extrusions require exact channel dimensions to seat flush. Measure your aluminum profile with digital dial calipers down to 0.1mm before picking your bit diameter.
Executing Blind Stopped Grooves
Mark starting and stopping positions on both your guide track and router base with a white pencil. Plunge the cutter into the lumber while holding the base rigid. Advance forward at an even 50mm per second feed speed. Stop cleanly on your mark, release the plunge lock, and allow the motor to rise completely before killing the switch.
Managing Chip Clearance and Vacuums
Chips packed into a deep blind channel trap intense heat and force the bit to re-cut waste. Hook a 36mm anti-static vacuum hose directly to the tool dust shroud. An undetected dust collection choke fills the blind recess instantly, throwing fine sawdust into your face and distorting your visual reference line.
Wiring Integration, Thermal Channels, and Final Assembly
LED strip lights generate continuous low-level heat that degrades adhesive backings over time. Direct wood mounting traps thermal energy and causes premature diode failure. You must install metal extrusion channels to act as continuous heat sinks.
Routing Through-Holes for Cabling
Bore a 10mm through-hole at the far termination corner of your channel. Run your low-voltage cabling out through the back panel. Relieve the backside timber with a 20mm round-nose cutter to create a recess for the 24V transformer and dimmer module. Keep wire runs separated from metal bed frame hardware by at least 30mm.
Dry-Fitting Extrusions and Diffuser Lenses
Press the aluminum track into the groove by hand. It should seat flush with 0mm protrusion beyond the timber face. If the fit feels tight, take a micro-shaving pass using the best wood router base setup rather than forcing the metal in with a hammer. Snapping a frosted polycarbonate diffuser lens into place gives an even, seamless wall wash without harsh diode hotspots.
Field Deployment and Final Checkout
Inspect your milled slots thoroughly with raking shop light before applying any finish. Scrape away micro-fuzz with 220-grit sandpaper wrapped around a square hardwood block. Never use handheld rotary discs in router grooves because rounded shoulders will ruin your shadow lines. Once your joinery passes inspection, wipe the wood clean with denatured alcohol, mount the fixture to wall studs with heavy French cleats, and energize the system. Build your next custom headboard with integrated LED lighting following these precise operational steps.